Tuesday, October 26, 2021

Week Ten

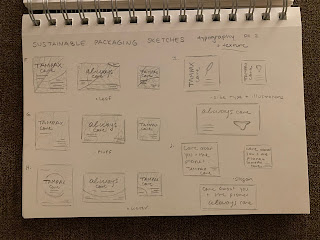
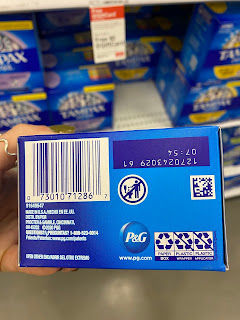
I presented my paper prototype to the class for feedback and decided to move the top down to the front side so on a shelf the tampons would't be sitting sideways.

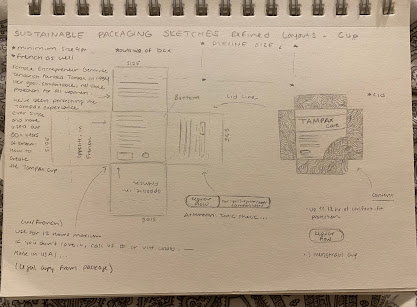
While in class, I went up to the fab lab to get a scrap of the the single ply cardboard which I think is actually just a heavy weight brown cardstock... I wanted to see how the substrate would fold and how much clearance I should leave for the text. I first folded without scoring and got some wrinkles and cracks so the next fold I scored with the top of my lack-of-eraser lead pencil and it looked much better. I make a little sleeve like my tampon box would be. 


The rest of the day and night I spent working on the final art. I kept with the 9pt font being the minimum size and adjusted kerning/leading for the legal copy so it appears smaller. I found a barcode generator online and used the products I was referencing for content for the barcode number. I also adjusted the dielien stroke to be the 0.001 so the laser cutter cuts not engraves that part. My next step is to add the line texture and mask off the parts I want to show. I will then send it to Professor Mata for the final step of feedback. 


_________________________________________________________________
 
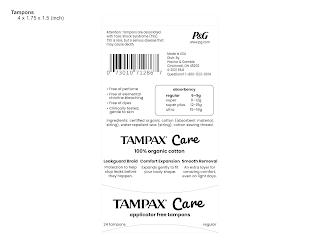
After working out the text layout I worked on the line texture. I kept the same weight as the Care text to help tie that in better as the font I chose is a little heavy in visual weight compared to everything else. It took lots of clipping mask and selection tool deletes but I finally worked out a layout. I'm going email it to Professor Mata now for some more feedback and print out dielines tomorrow to double check the specs before I go to do the final print. 


_________________________________________________________________


I heard back from Professor Mata about some suggestions on what to fix. She shared with me the following:

Your designs look very professional. I can’t wait to see them engraved. If you have problems or issues with the engraving don’t freak out! I would rather see you try and fail than not try at all.  

Just a few things to look at…

  1. Make the barcode smaller on the pads. 
  2. For all make the Ingredients italic. (unless it won’t engrave)
  3. Menstrual cup: on the Made by Women side, look at the edge tension of the body copy. 


Professor Mata


I made two of the adjustments she suggested but I did not italize the ingredient as I'm not sure how that would effect the engraving. I would rather play it safer especially with trying something so new.

I printed out my dielines with my work to check more of the edge tension and orientation. I bumped a few more text items in on the cup package and I flipped around the bullet point list panel on the tampons as it was was upside down. I also realized I missed adding the line art to the sides of the underwear box, so I fixed that as well. 


I've been in communication with the fabrication lab tech, Zach, to get more information on how engraving works. One point he shared with me is that I need to make sure that no lines are overlapping and that everything is ungrouped. Because of my clipping masks I had many groups with the lines and even the barcodes. 

I began brainstorming of how I can cookie-cutter cut out the shapes. I started with releasing the masks and placing the shapes ontop to divide and then delete everything that was cut and on the outside of the shape. Then my friend and classmate Hannah O'Steen shared with me a tutorial she found using the clip tool in pathfinder and I was able to quickly delete everything on the outside of the clipping mask and then ungroup the lines.

Tuesday, October 19, 2021

Week Nine

In class we shared our revised/final sketches in small groups and then to Professor Mata. The main concern my group shared was that pattern maybe too busy. I shared with them my concept of engraving the design and how it will appear more subtle. With Professor Mata I spoke to her about having both French and English on the packaging. She told me to just focus on the English for now especially because I am trying out the engraving for the first time and I want to make sure the text is large enough to read.

Next we went into Adobe Dimensions and began to play around with how to create 3D renderings. For this assignment, we are to submit a 3D mockup of the design, unless the package is unique in shape and we can't find a template, then we can print the project out. 

Because I'm wanting to add a special effect with the engraving and my packaging is more unique, I'm going to print my set out and make a physical version of them. 

I used the art from my last project and found a free download of a sauce bottle on Adobe Stock and made a rendering of the design.


________________________________________________________________

The next step of my project is to go digital. I went back to 
templatemaker and began working on the measurements of my dielines. I measured the box of the o.b. organic tampons for my tampon box and a new menstrual cup for the width and height of the cup box. I also folded up a pair of new period underwear to get the length, width, and height of that box as well. I downloaded the dielines as svgs and brought them into Illustrator. 


Before I started the final art I wanted to make sure my dielines would be the correct size and fold correctly. Thankfully I did check because my cup box was too big so I brought it in an inch. Because the laser engraver has a minimum pt size of 9 for text, I used my tampon match box dieline to draw on and fold to get a rough estimate of it visually. I put the o.b. tampons in the box for now but because they have a logo on them I'll have to try and photoshop it out or remove the plastic. 


Monday, October 18, 2021

Week Eight

After receiving feedback from Professor Mata I began my final sketches of the layouts. Here is the feedback she let me: 

You did a good job with your sketches and concepts. The ones that seem to be working the best are the Nature concepts C and D. The Typography concept could work depending on the words you would use. Perhaps you could use empowering words. If you decide to go with textures be careful they don't look like pimples. I am excited to see what you can do with the laser cutter. Do some tests before you commit and remember not too many details in the design. Pick the concept you want to do and do more refined drawings or experiment with the laser cutter to see which one would work best.   

The nature concepts she favored is the the water element and the poppy flowers. I decoded to go with the water, flowing design because while period products are targeted for women, female products don't have to be overly feminine.


With the laser cutter test/example sheet there is an example of using lines and creating a texture. For my next set of sketches I really focused on that pattern and how I can position the engravings on the package elements as well as set a plan for a text layout. I used the tampon packaging and the current Always nighttime underwear as well as Unders reusable underwear and collected content. For the cup I found a photo online of the package as they didn't sell the Tampax cup brand at the target I went to. 


I want to make the packages as realistic as possible which means including all the tiny warning content and legal information. However, I noticed on the packaging that the underwear and cup have all the same information in French too but the tampons have English and Spanish. I'm taking French right now so I'm thinking it would be fun, different, and realistic to include the French, however with the engraving I want to make sure I have enough space.


For class on Tuesday I'm going to work on setting up the measurements of the dielines and print out some test versions to make sure the sizing is correct and everything fits before I begin working on the final art and layout.

_____________________________________________________ 

Sunday, October 10, 2021

Week Seven

For class on Tuesday we took a trip to our new fabrication lab the department refurbished. We now have access to more laser cutters, 3D printers, a new a water laser cutter and an epoxy printer. 

We learned about how we could engrave using the laser cutter and what substrates we can use to print or engrave on. The lab tech passed around a booklet of different substrates and how the engrave/cuts would appear. 


My original thought was to use a substrate like single ply cardboard and only print using minimal color, but now I want to use only the engraving technique without any color. I'll have to make sure the engraving is at 100%. I don't want to cut into the package at all as it will effect the structure and will probably make it too unstable. 

I started working on some sketches. I have three different directions I'm exploring: nature, texture/typography and watercolor. I don't think I will want to include color, but it's a possibility. I asked the lab tech if I can borrow some scraps to explore with the colors. 


There are a couple of directions I think could work. Having the circle in the middle fits the current brand and looks like a globe too. I also think the leaf texture could be interesting if I can execute that softly in the background.

The watercolor maybe a direction, but I need to get the scrap pieces first from the lab to explore more. 

_________________________________________________________

I went to Target to find some more inspiration and take some photos of preexisting packages to use the content. I still want to use the Tampax/Always brand but I'll use some of the information from other products to work out what content I should have. 


_________________________________________________________

Both the Unders underwear and tampons are smaller packages compared to others. I would like to keep them a similar size but I want to make the packages a little more unique. I found three options on Templatemaker I can use.

Tampons:


Underwear:


Cup:


FINAL WEEK

Painting the sheets became a bit of a struggle I wasn't expecting. I started by painting one sheet, doing my best to get the yellow colo...